

I like designing my layouts in SCAL for lots of reasons. I love seeing what the project will look like before I cut or print anything. This saves me from having to re-cut shapes because I didn't like the color or the size was wrong. Also, I like that I can design anywhere I can bring my mini computer - a scrapbook retreat, coffee shop, wherever! Once the design is complete, the process to put the project together is fast - just cut & glue!
Here are six helpful tips when designing your layouts in SCAL. I have included step-by-step instructions for each of the tips below.
Tip #1:
Select a large rectangle or square shape from the SCAL Shapes Library to create the background of your layout.
Select the shape from the Shape Library by clicking on it. In this example, I selected the horizontal rectangle.

Next, change the size of the shape to match your layout size. Change the width and height as shown in the circled area below.

In my example, the background is 20" wide by 10" tall.

Tip #2:
Change the color of the shapes to represent the color paper you plan to use.
To change the color of a shape, click on the colored box under Properties: Appearance (circled in Red below).

Then, select the color you want and click OK.

The shape should now be the color you selected.

Tip #3:
Add the photos you plan to use. I add my photos to the layout for design purposes only - I use photo editing software to print my photos. However, printing digital stamps, paper patterns, graphics, word art, etc. onto cardstock from SCAL works great!
To add a photo, click on the File menu and select "Place Image."
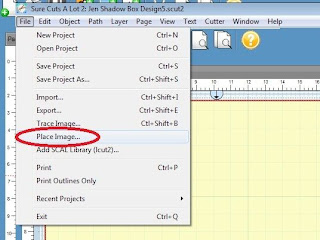
Then browse for the photo image on your computer, select the image, and click Open.

Then, change the size of the image to the size of the photo print.

Move the picture to where you would like it placed on the layout. I usually add all of my photos to the layout first. Then I move the photos around (via trial and error) to determine where I like each of them placed on the layout.

Tip #4:
Use shapes to create boxes for text, to show where paper and/or ribbon will be placed, etc. - the possibilities are endless! In my layout, I used rectangles to display where I plan to place a quote (taupe box) and the date the photos were taken (bottom right corner). Also, I used rectangles to represent the paper I plan to use (large brown rectangle in the background), to create my photo mats, and to represent where I will place ribbon (around the bracket frame, under the title).
Tip #5:
Use the Layer options to reflect how you would place the shapes, SVGs, and photos on the layout.
For example, in the screen shot below the circled photo is on top of the photo adjacent to it. I want the adjacent photo on top.

To fix the arrangement of the layers, click on the photo you want on top.

Next, go to the Layer menu and select Arrange-->Layer to Top

The photo selected should now be displayed above the other photo.

You can also move layers to the bottom (the background should always be at the bottom), or raise/lower the layers using the Layer menu. See all options under Layer menu-->Arrange.
Add pages to your project for individual shapes and/or SVGs to be cut on your Cricut. This makes cutting so much easier and you can leave your designed layout intact on the first page.
To add a new page to the project in SCAL, click on the Add Page icon circled in Red below (green plus sign, next to the Page 1 header).

You can change the Name of the page if you would like, then Click OK.


I hope these tips were helpful for you and hope you try designing a layout in SCAL.
Update: I finished making this shadow box. Click here to see it.
Thanks for stopping by,
That is awesome, Melanie! I'm sure it really helps get the project looking just perfect when you can fine-tune it and see what it basically looks like before you cut everything out! I didn't realize you could see photos in SCAL. Perfect for just what you did. Thanks for sharing!!
ReplyDeleteWow~Melanie, thanks for sharing this info. I do like to lay everything out before cutting on my mat but didn't realize I could put photos on my mat. Dont forget tomorrow a new Scrappy Saturday with the Bug challenge will be posted, so come by and check it out! Have a great weekend!! Melissa :)
ReplyDeleteThank you for the step by step!
ReplyDeleteI love!
What a cool idea! Thanks for sharing!
ReplyDeleteOh thank you so much for this tips. I'm still discovering things about this amazing program! wow i didn't know you can use your pictures in SCAL!!
ReplyDeleteThis is great!! TFS
ReplyDeleteWow! I am just a newbie to scale...so I can use all the help I can get! Thanks for stopping by my blog and leaving a comment. I am now a follower and look forward to searching your blog for more great tips!
ReplyDeleteWhich version of scal are you using? I have 2 scal2 on my mac and I can't put pictures in.
ReplyDeleteHi Lindsay, I am using SCAL2. What type of file are your pictures (JPEG, PNG, etc.)? You may need to convert them to a different type to get them to upload to SCAL2. Feel free to email me with any additional questions you may have. My email is mfink197 at gmail dot com
ReplyDelete