
Here are the Instructions:
Step 1: Download the free Autostitch software available at autostitch.net. Once downloaded, unzip the autostitch folder. To unzip, right click on the autostitch folder and click Extract All. Then browse to where you want to save it (I saved to my desktop), and click Extract.
Step 2: Scan each of the 4 corners of your scrapbook page using your scanner (see your scanner manual for how to scan) and upload the scanned images into your photo editing software. I use Picasa photo editing software by Google - it is free and it works great! You can download Picasa here.

Step 3: In your photo editing software, rotate each of the 4 corner images to clockwise. Note: If an image isn't straight, you should straighten it in your photo editing software or rescan the image.

Step 4: Save each image as a JPEG file (the images are usually scanned as a BMP image). To Save, click on the image. Go to the File menu-->Save As. Then browse to where you want to save the image and click Save.
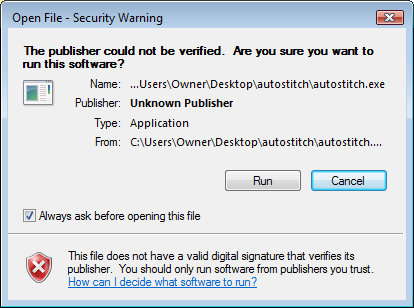
Step 5: Go to the autostitch folder you saved in Step 1. Open the folder and double click on the Autostitch software (circled in Red below).

Step 6: Click Run
Step 7: Go to File-->Open

Step 8: Browse to where you saved the images in Step 4. Select all 4 images by clicking on them while holding down the Ctrl key. Then click Open.

Step 9: The autostitch software will now run. When it is finished, it will display the stitched image.

Step 10: Edit the image in your photo editing software if you desire. Make sure to Save the stitched image.
Please leave a comment if this tutorial was helpful and/or if you have any questions about these instructions. I will respond to questions as soon as I can. Have a great day!
Couldn't you scan the pages in two parts, instead of 4?
ReplyDeleteThanks for the question. If you have a scanner that is at least 12" in one direction, then you could scan your 12x12 page in 2 sections. My scanner is a standard letter size (8 1/2 x 11) so I need to scan all 4 corners.
ReplyDeleteI manage a team of IT professionals. I wish they would take the time to write instructions as clear as your's. Good job and very much appreciated. Thank you!
ReplyDeleteGracias, es super útil!!!!
ReplyDelete